You are viewing an old version of this page. View the current version.

    Compare with Current View Page History

    « Previous Version 22 Next »

    Step by step instructions for submitting 3dsMax jobs with Qube!


    Step 1 (First Time Only)


    You will need to have installed the 3dsmax jobtype. If you see a Qube! menu item in the top menu bar, the jobtype is already installed, and you can move to Step 2.

    Installation:
    If you are not familiar with the installation process please refer to the Quickstart section on installing workers, or to Installing Jobtypes. <if this doesn't exist, it should> You will need to select "3dsmax Jobtype" during the installation process .

    Step 2

    Once installed you should be able to locate the "Qube!" menu in 3dsMax

    InApp Location: 

    File Menu -> Qube!

    Step 3

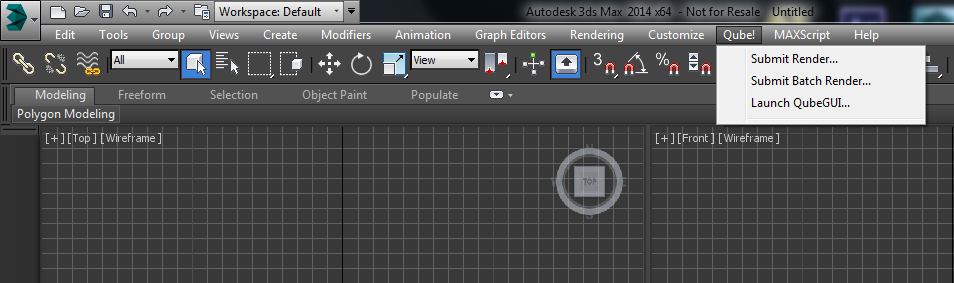
    With a scene loaded in 3dsMax choose "Submit Render...".

    Note that you could also choose "Submit Batch Render..." depending on your requirements.

    Render vs Batch Render

    Icon

    What's the difference?

    Submit Render will open a single copy (instance) of 3dsMax on the Worker that picks up the job, and that instance will send out frames to be rendered. The Supervisor will then assign those frames to Workers. Since the scene file is only being opened one time, this can be faster to generate the full sequence.

    Submit Batch Render will use the command line to open a new instance of the 3dsMax file for each frame that it renders. Although this can be slower for large scenes, it can also be more flexible in large, complex environments.

    This will present a pre-filled submission UI like the one here.


    Step 4

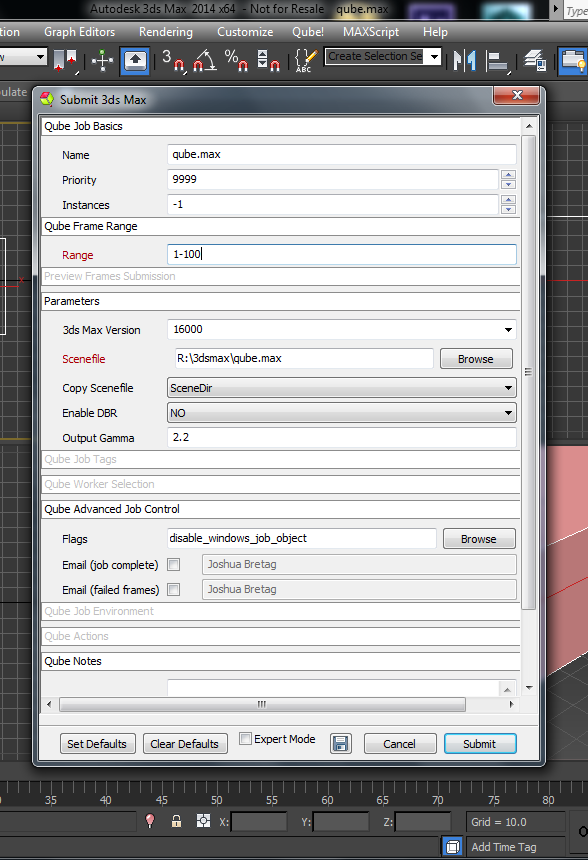
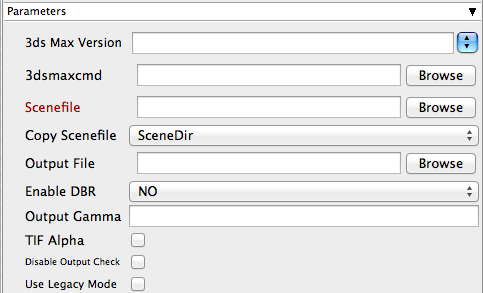
    Ensure sections marked in red have the correct details

    Click submit

    For further details on the submission UI look in the right panel

    Troubleshooting

    If you find you are getting errors here are some useful links for troubleshooting, please first be sure that you've installed max correctly for use on a render farm: Installing and Licensing 3ds Max on a Worker Node

    Troubleshooting Flowcharts 


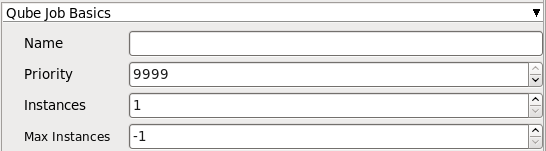
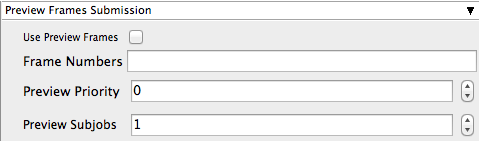
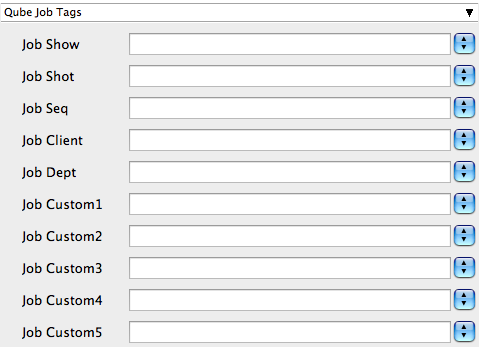
    Job Submission Details


    Icon

    Not all sections need to be filled in in order to render. Only the fields marked in red are required.


     Click here for details...

    Name
    This is the name of the job of the job so it can be easily identified in the Qube! UI.

    Priority
    Every job in Qube is assigned a numeric priority. Priority 1 is higher than priority 100. This is similar to 1st place, 2nd place, 3rd place, etc. The default priority assigned to a job is 9999.

    Instances
    This is the number of copies of the application that will run at the same time across the network. The combination of "Instances=1" and "Max Instances=-1" means that this job will take as much of the farm as it can, and all jobs will share evenly across the farm.

    Examples:

    On a 12 slot(core) machine running Maya if you set
    "Instances" to 4
    "Reservations" to "host.processors=3"
    Qube! will open 4 sessions of Maya on the Worker(s) simultaneously, which may consume all slots/cores on a given Worker.

    if you set
    "Instances" to 1
    "Reservations" to "host.processors=1+"
    Qube will open 1 session of Maya on a Worker, consuming all slots/cores ("host.processors=1+" is used for all slots/cores).

    Max Instances
    If resources are available, Qube! will spawn more than 'Instances' copies of the application, but no more than 'Max Instances'. The default of -1 means there is no maximum. If this is set to 0, then it won't spawn more than 'Instances' copies.

    More on Instances & Reservations & SmartShare Studio Defaults


     Click here for details...

    Use Preview Frames  

    Enabling preview frames will create 2 jobs:

    • A primary dependent job with a higher priority that will render the selected frames first 
    • A secondary job with lower priority that will render the remaining frames. This will return the selected frames faster so that you can check the accuracy of your renders.

    Frame Numbers

    Choose the frames that you wish to render first. If left blank the default is to render the first frame, the last frame and the middle frame in that order. You can select specific frames by adding comma separated frame numbers e.g 1,2,10,15,75, or a range with, e.g., 1-100x5 (1 to 100, every 5th frame)

    Preview Priority

    Choose the priority for the preview job. This can be set by the site admin.

    Preview Subjobs

    Choose the number of instances / subjobs for the preview frames. By default, this is equal to the number of preview frames - that is, it will try to do all the preview frames at the same time.

    Note that when you submit a job with preview frames enabled, it will actually submit 2 jobs—one with the preview frames list at a higher priority, and another with the rest of the agenda, at the normal priority (as specified in the job's Priority field). You will get, consequently, 2 job IDs for the submission.


     Click here for details...

    Range  

    Frame range for the job (e.g 1-100, or 1-100x3, or 1,3,7,10). Most jobs require a frame range to execute on the Workers. You can set this range in a few different ways :

    • "1-100" will just render the range between 1 and 100
    • "1-100x3" will render every 3rd frame in the range 1 to 100; 1, 4, 7, ..., 94, 97, 100
    • "1,3,7,10" will only render the selected frames 1,3,7,10

    rangeOrdering
    Order to render the items. (Ascending=1,2,3,4,5...,Descending=10,9,8...,Binary=first,middle,last...) You can set the order in which your frames are rendered. The drop down options are:

    • "Ascending" - this will render the frames counting upwards from your start frame
    • "Decending" - this will render the frames counting backwards from your end frame
    • "Binary" - This will render the first, last, and middle frames of the range, then the middle frame of the first half and the middle frame of the second half, and so on. This is useful for sampling the frames in the sequence to make sure it is rendering correctly.

    Parameters Specific to 3dsMax

     Click for here for details...

    3ds Max Version
    Sets the version of 3d Studio Max on the worker. You may also use numeric version numbers, such as "13000" for v2011, "10000" for v2008, "9000" for v9, etc. This should normally be left blank.

    3dsmaxcmd
    Browse for or enter manually the location of 3dsmaxcmd.exe on the worker - e.g. C:/Program Files/Autodesk/3ds Max 2011/3dsmaxcmd.exe. This should normally be left blank.

    Scenefile
    Browse or enter manually the location of the scene file to be rendered. This is a required field for submission. Important: Best practice is to ensure the scene file and all of its dependent files such as textures are on network storage accessible by the workers.

    Copy Scenefile
    Whether or not every instance should create and work with its own copy of the scenefile to workaround an older 3dsmax limitation that would not allow a single copy of a scene file to be loaded by multiple computers at the same time. This limitation may have been resolved by Autodesk in more recent versions, but the options remains for legacy reasons.

    Output file
    Browse for or manually enter the location of the output file you wish to generate. Important: Best practice is to ensure outputs are written to network storage accessible by the workers. This is normally already defined in the 3dsMax file.

    Enable DBR
    Enable DBR for mental ray or V-Ray. See also Distributed Renders with mental ray or V-Ray.

    Output Gamma
    Manually override the scene file gamma setting without opening 3dsMax.

    TIF Alpha
    Manually override the scene file alpha-channel without opening 3dsMax.

    Disable Output Check
    Ensures that the 3dsMax filecheck is not enabled. By default, 3dsMax will check for the existence of an output file after a render.

    Use Legacy Mode
    Use legacy mode (required for 3dsMax prior to v2008. Will not work for v2013 and above). Only required if running 3ds Max < 2008.

     Click here for details...

    Qube Job Tags
    New in Qube 6.5

    Note: The Job Tags section of the submission UI will not be visible unless they are turned on in the Preferences in the Wrangler View UI. Job Tags are explained in detail on the Job Tags page.


    • No labels