You are viewing an old version of this page. View the current version.

    Compare with Current View Page History

    « Previous Version 13 Next »

    Step by step instructions for submitting Cinema 4D jobs with Qube!


    Step 1 (First Time Only)

    The Cinema 4d Jobtype comes with the standard install of Qube! and does not require a specific jobtype to be installed 
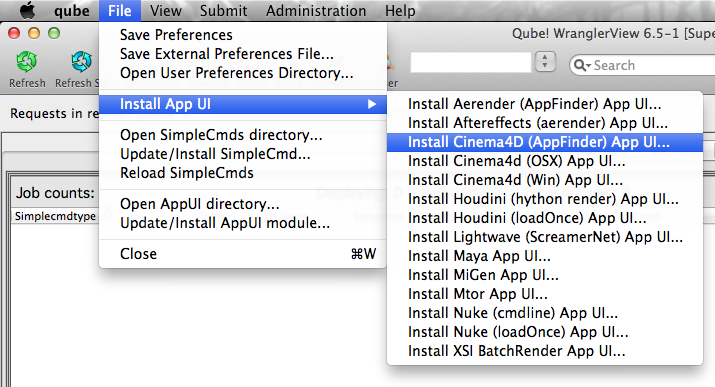
    InApp Installation:

    File > Install App UI > Install Cinema4D (AppFinder) App UI...


    Step 2


    Once installed you should be able to locate the "Qube!" menu in Cinema 4d

    InApp Location:

    File > Script > User Scripts > Qube! Submit (Appfinder)


    Step 3

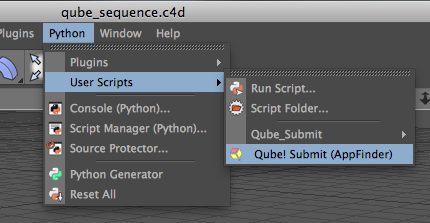
    With a scene loaded in Cinema4d choose "Qube! Submit (AppFinder)"

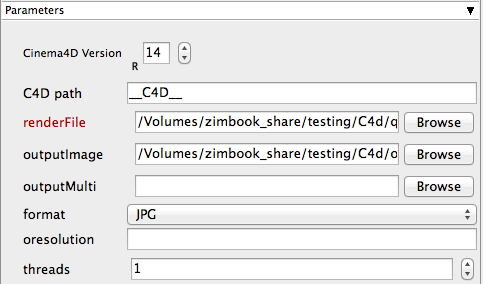
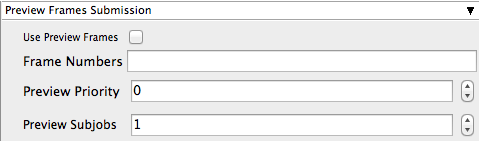
    This will present a pre filled submission UI. Ensure sections marked in red have the correct details.


    Should also set:

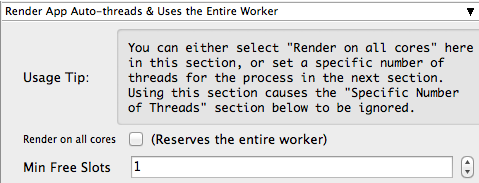
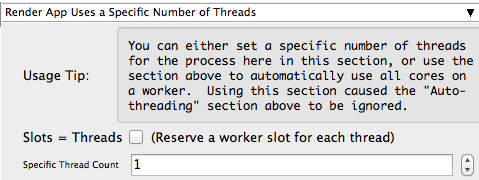
    expert mode, slots = threads and set to 8 (like maya)

    could choose render on all cores, but that's less efficient if you have lots of cores.

    Have to set the version - should be set based on the one you are submitting from, but check it.

    retry variables as before.

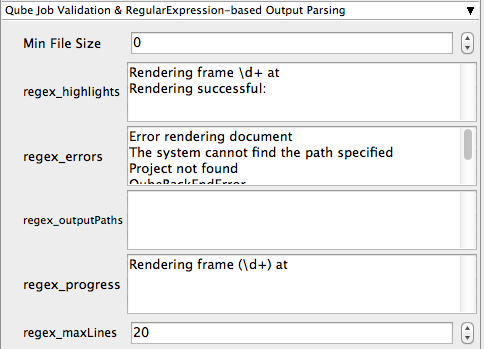
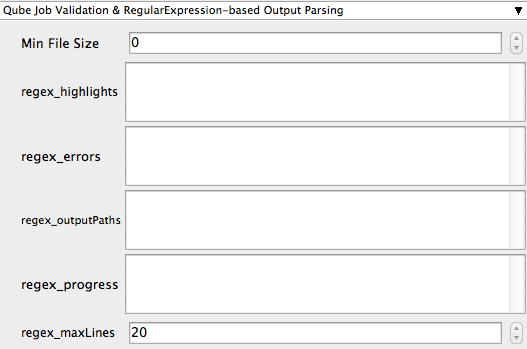
    Always returns success on Windows, so have to parse output logs. regex_errors field. Add any relevant phrases to that.
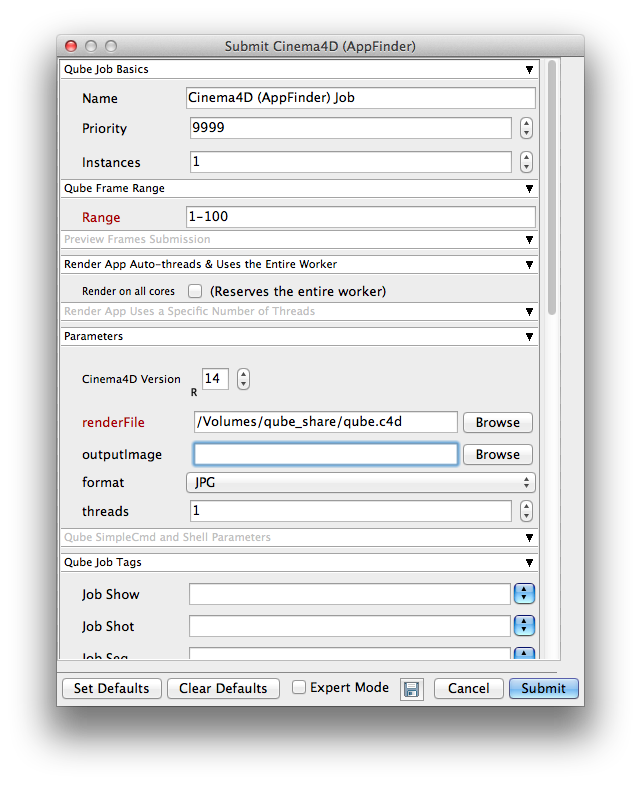
     

    Step 4

    Click "Submit"

    For further details on the submission UI see below.


    Troubleshooting

    If you find you are getting errors here are some useful links for troubleshooting

    Troubleshooting Flowcharts 


    Below Is an expandable view of the AppFinder Jobs > "Aerender (AppFinder) Job..." Jobtype Submission UI

    Icon

    Not all sections need to be filled in in order to render only the fields marked in red are required


     Click here for details...

    Name
    This is the name of the job of the job so it can be easily identified in the Qube! UI.

    Priority
    Every job in Qube is assigned a numeric priority. Priority 1 is higher than priority 100. This is similar to 1st place, 2nd place, 3rd place, etc. The default priority assigned to a job is 9999.

    Instances
    This is the number of copies of the application that will run at the same time across the network. The combination of "Instances=1" and "Max Instances=-1" means that this job will take as much of the farm as it can, and all jobs will share evenly across the farm.

    Examples:

    On a 12 slot(core) machine running Maya if you set
    "Instances" to 4
    "Reservations" to "host.processors=3"
    Qube! will open 4 sessions of Maya on the Worker(s) simultaneously, which may consume all slots/cores on a given Worker.

    if you set
    "Instances" to 1
    "Reservations" to "host.processors=1+"
    Qube will open 1 session of Maya on a Worker, consuming all slots/cores ("host.processors=1+" is used for all slots/cores).

    Max Instances
    If resources are available, Qube! will spawn more than 'Instances' copies of the application, but no more than 'Max Instances'. The default of -1 means there is no maximum. If this is set to 0, then it won't spawn more than 'Instances' copies.

    More on Instances & Reservations & SmartShare Studio Defaults

     Click here for details...

    Range
    Frame range for the job (e.g 1-100, or 1-100x3, or 1,3,7,10)

    Most jobs require a frame range to execute on the workers. You can set this range in a few different ways :

    • "1-100" will just render the range between 1 and 100
    • "1-100x3" will render the range 1 to 100, every third frame, so 1, 4, 7, etc.
    • "1,3,7,10" will only render the selected frames 1,3,7,10

    Execution
    How to break up frame range to be executed. Use QB_START_FRAME, QB_END_FRAME and QB_FRAME_NUMBER

    When submitting a job to the farm it may be more efficient to "chunk" your job. This means that when the job is sent to the worker it tells the worker to render N consecutive frames before requesting more work. You would do this to keep from reopening the scene file for each frame. Large scene files can take substantial time to open, which is wasteful across dozens or hundreds of frames.

    The drop down options are below:

    • "Individual frames" this tells the worker to render 1 frame at a time.
    • "Chunks with n frames" this tells the worker to render consecutively the number of frames specified in the field.
    • "Split into n partitions" this tells the worker to render consecutively the total frames in the range divided by the number in the field.

    Examples:

    • range 1-100 with "individual frames" set will render 1 frame at a time
    • range 1-100 with "Chunks with n frames" and the field set to 5 will send 20 frames to each instance
    • range 1-100 with "Split into n partitions" and the field set to 4 will send 25 frames to each instance

    rangeOrdering
    Order to render the items. (Ascending=1,2,3,4,5...,Descending=10,9,8...,Binary=first,middle,last...)

    You can set the order in which your frames are rendered. The drop down options are:

    • "Ascending" - this will render the frames counting upwards from your start frame
    • "Decending" - this will render the frames counting backwards from your end frame
    • "Binary" - This will render the first, last, and middle frames of the range, then the middle frame of the first half and the middle frame of the second half, and so on. This is useful for sampling the frames in the sequence to make sure it is rendering correctly.

    Unable to render {include} The included page could not be found.

     Click here for details...

    New in 6.4-4
    For applications/renderers that do not support using all cores while rendering (or changing that behavior, eg AfterEffects or 3dsMax), this section is not visible.

    Render on all Cores
    Checking this box means that once this job is assigned to a machine, no more jobs or instances will be assigned to the same machine until this job is complete. You might choose this if your know your render job is very memory intensive and shouldn't run alongside other jobs.

    Min Free Slots
    This is the number of slots that must be available on a worker in order for the worker to accept the job. For example, if you choose '1', a worker with 7 out of 8 cores already in use will still accept this job. However, if you were to choose '2', the same machine under the same circumstances would not accept the job. 


    Preemption

    Icon

    This option does not preempt any previously running instances on the worker, it only prevents additional instances from being assigned to this worker.


     Click here for details...

    New in 6.4-4
    For applications/renderers that do not support setting a specific number of threads, this section is not visible.

    Slots = Threads
    If this box is checked, it tells Qube and the application (eg, Maya) to use the specific number of threads listed in the "Specific Thread Count" field. If this is not checked, then the "Specific Thread Count" value is passed only to the application, but Qube is unaware of the number of cores/slots it should reserve. In most cases, you will want to check this box, unless you have Designer licenses, in which case you would only set the numeric value.

    Specific Thread Count
    This tells the renderer to use a specific number of threads for rendering. The default is one thread, which for any modern renderer will underperform, and when combined with the slots=threads, will swamp most workers by running as many instances as there are slots (eg, a 24 core machine would run 24 instances of the application/renderer). A better value is 8 (assuming you have 8 cores, as most modern machines do) which means that each instance of the job will use 8 threads to render, and, when combined with slots=threads, will reserve 8 slots while doing so.

    Designer License

    Icon

    Designer licenses are restricted to 1 slot, so if you are using a Qube Designer license, set the Specific Thread Count, but do not check the "Slots=Threads" option.

    Unable to render {include} The included page could not be found.


     Click here for details...

    Cmd Template
    This is used to create the command string for launching the job on the worker. It will be set differently depending on the application you are launching from.

    Shell (Linux/OSX)
    Explicitly specify the Linux/OS X shell to use when executing the command (defaults to /bin/sh).

    Error rendering macro 'excerpt-include' : User 'null' does not have permission to view the page 'QUBE:._SimpleCMD_QubeWorkerSelection v7.5-0'.

    Error rendering macro 'excerpt-include' : User 'null' does not have permission to view the page 'QUBE:._SimpleCmd_AdvancedJobControl v6.6-3'.

    Error rendering macro 'excerpt-include' : User 'null' does not have permission to view the page 'QUBE:._SimpleCMD_QubeJobEnvironment v6.6-3'.

    Unable to render {include} The included page could not be found.

    Error rendering macro 'excerpt-include' : User 'null' does not have permission to view the page 'QUBE:._SimpleCMD_QubeActions v6.6-3'.

    Error rendering macro 'excerpt-include' : User 'null' does not have permission to view the page 'QUBE:._SimpleCMD_QubeNotes v7.0-0'.

    • No labels