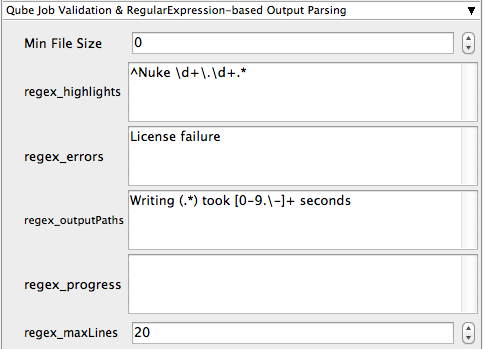
You are viewing an old version of this page. View the current version.

    Compare with Current View Page History

    « Previous Version 10 Next »

    Below are instructions on your first steps submitting Nuke jobs with Qube!


    Step 1 (First Time Only)

    The Nuke Jobtype comes with the standard install of Qube! and does not require a specific jobtype to be installed. Requires Python be installed on the Workers. If it's not installed, you can use Nuke (cmdline)

    InApp Installation:
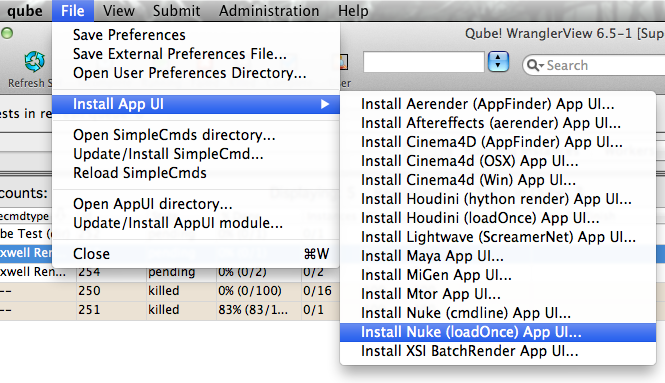
    File > Install App UI > Install Nuke (loadOnce) App UI...

    Step 2

    Once installed you should be able to locate the "Qube!" menu in Nuke

    InApp Location:
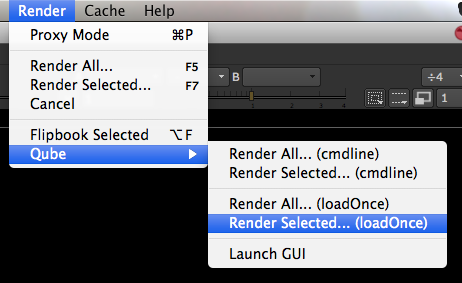
    File > Render > Qube >

    Step 3

    With a script loaded in Nuke choose to render the entire script, or the selected write node(s), as either "Render All...(cmdline)" or "Render All...(loadOnce)" depending on your requirements.

    loadOnce vs cmdline

    Icon

    What's the difference?

    loadOnce will open a copy (instance) of Nuke on the Worker that picks up the job, and that instance will render frames as assigned by the Supervisor. Since the scene file is only being opened one time, this can be faster to generate the full sequence.

    cmdline will use the command line to open a new instance of the Nuke file for each frame that it renders. Although this can be slower for large scenes, it can also be more flexible in large, complex environments.

    This will present a pre filled submission UI.

    Can set reserve all cores, but should probably set slots=threads and 8 cores instead.

    set nuke version and OS

    retry stuff

    Can't mix OSs
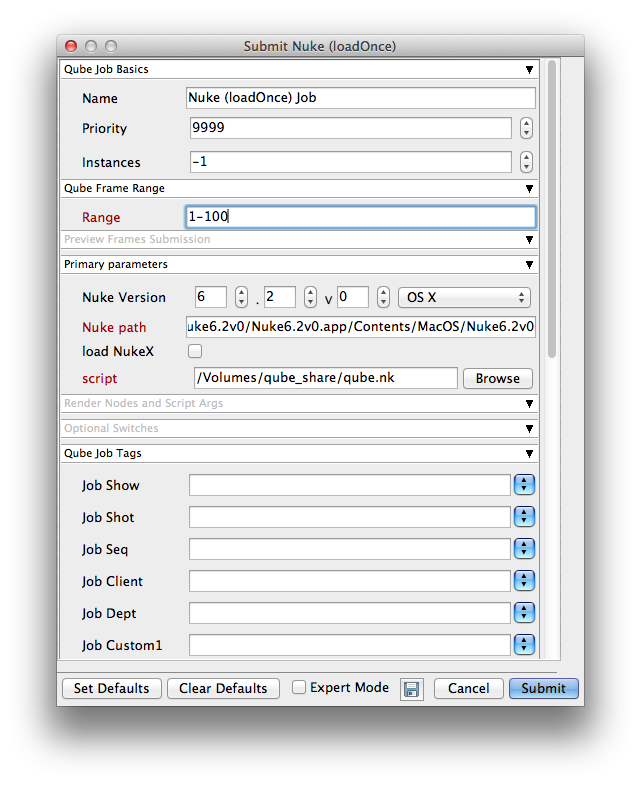
     

    Step 4

    Ensure sections marked in red have the correct details

    Click submit

    For further details on the submission UI look in the right panel

    Troubleshooting

    If you find you are getting errors here are some useful links for troubleshooting

    Troubleshooting Flowcharts 


    Below Is an expandable view of the "Nuke (loadOnce) Job..." Jobtype Submission UI

    Icon

    Not all sections need to be filled in in order to render only the fields marked in red are required


     Primary parameters

    Nuke Version

    Tooltip - Select version numbers and the worker platform to make an educated guess at where the Nuke executable is found on the remote worker.

    Icon

    Use the spinners to enter the required version of nuke

    Nuke path

    Tooltip - explicit path to Nuke executable

    Icon

    Browse or enter manually the location of Nuke executable on the workers

    Important : Always double check the location of the workers executable. Be aware that if you are submitting cross platform the path will be different.

    load NukeX

    Tooltip - load NukeX

    Icon

    placeholder

    script

    Tooltip - nuke script to execute

    Icon

    Browse or enter manually the location of the nuke file to be rendered. This is a required field for submission

    Important: Best practise is to ensure the nuke file and all of its dependant files such as textures are on network storage accessible by the workers.

     Render Nodes and Script Args

    execute views

    Tooltip - only execute these views (comma-separated list: e.g. 'left,right'

    Icon

    list comma separated views to render. These are named in your nuke script

    execute nodes

    Tooltip - execute only this node

    Icon

    Execute on the specified node. These are named in your nuke script

    script args

    Tooltip - All words between the script name and the frame ranges can be used by [argv n] expressions to provide changing arguments to the script. Each must start with a non-digit to avoid confusion with frame ranges.

    Icon

    Explanation and example needed

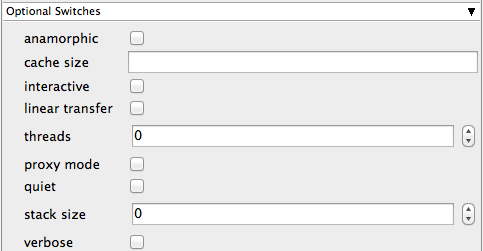
     Optional Switches

    anamorphic

    Tooltip - formats default to anamorphic

    Icon

    Tick box to override scene anamorphic settings

    cache size

    Tooltip - limit cache memory usage. Size is in bytes, or append k, M, G or T

    Icon

    Enter the numeric value to override scene cache size settings

    interactive

    Tooltip - with -x or -t use interactive, not render, license

    Icon

    Tick box to override scene interactive settings

    linear transfer

    Tooltip - apply linear transfer to the file read in

    Icon

    Tick box to override scene linear transfer settings

    threads

    Tooltip - set threads to n

    Icon

    Enter the numeric value to override scene threads settings

    proxy mode

    Tooltip - turn on proxy mode

    Icon

    Tick box to override scene proxy mode settings

    quiet

    Tooltip - quiet (do not print stuff)

    Icon

    Tick box to override scene quiet settings

    stack size

    Tooltip - sets the minimum stack size for each thread in bytes, this defaults to 16777216 (16MB) the smallest allowed value is 1048576 (1MB)

    Icon

    explanation needed

    verbose

    Tooltip - verbosity (print more stuff)

    Icon

    Choose the level of detail you would like the logs to provide

    • No labels