You are viewing an old version of this page. View the current version.

    Compare with Current View Page History

    « Previous Version 6 Next »

    Below are instructions on your first steps submitting Cinema 4d jobs with Qube!


    Step 1 (First Time Only)

    The Cinema 4d Jobtype comes with the standard install of Qube! and does not require a specific jobtype to be installed 

    InApp Installation:

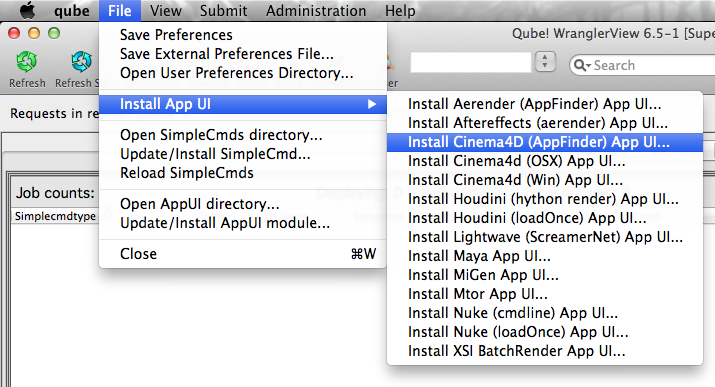
    File > Install App UI > Install Cinema4D (AppFinder) App UI...


    Step 2

    Once installed you should be able to locate the "Qube!" menu in Cinema 4d

    InApp Location:

    File > Script > User Scripts > Qube! Submit (Appfinder)


    Step 3

    With a scene loaded in Cinema4d choose "Qube! Submit (AppFinder)"

    This will present a pre filled submission UI


    Step 4

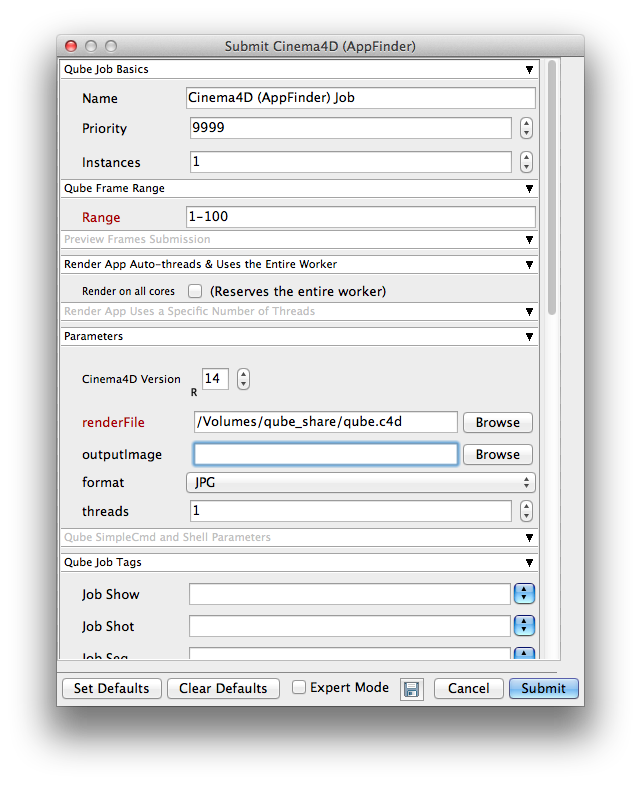
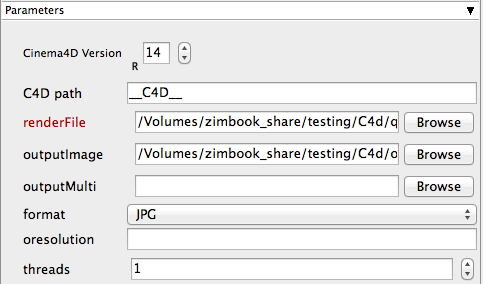
    Ensure sections marked in red have the correct details

    Click submit

    For further details on the submission UI look in the right panel


    Troubleshooting

    If you find you are getting errors here are some useful links for troubleshooting

    Troubleshooting Flowcharts 


    Below Is an expandable view of the AppFinder Jobs > "Aerender (AppFinder) Job..." Jobtype Submission UI

    Icon

    Not all sections need to be filled in in order to render only the fields marked in red are required


    Please click on the text below the section of interest


     Parameters

    Cinema4D Version

    Tooltip - Select version numbers to allow the job to find the right version of Cinema 4D executable on each worker.

    Icon

    Use the spinners to enter the required version of Cinema 4d

    C4D path

    Tooltip - Leave it set to "_C4D_" to allow the job to find the right version of Cinema4D on the worker.

    Icon

    Left default qube will automatically find the version of After Effects on the worker

    renderFile

    Tooltip - scene file to render

    Icon

    Browse or enter manually the location of the scene file to be rendered. This is a required field for submission

    Important: Best practise is to ensure the scene file and all of its dependant files such as textures are on network storage accessible by the workers.

    outputImage

    Tooltip - output imagename

    Icon

    Browse or manually enter the location of the output image you wish to generate

    Important: Best practise is to ensure outputs are written to network storage accessible by the workers

    outputMulti

    Tooltip - output multipass imagename

    Icon

    Browse or manually enter the location of the output image directory you wish to generate

    Important: Best practise is to ensure outputs are written to network storage accessible by the workers

    format

    Tooltip - output file format

    Icon

    Enter manually or select from drop-down

    Important: when choosing the output format be aware that extensions such as .MOV or .AVI can not be distributed across the farm. Please select an image sequence based format such as .TIF etc

    oresolution

    Tooltip - <width> <height> for image resolution override

    Icon

    Used for overriding the scenes resolution. IE: 800x600

    threads

    Tooltip - exact number of threads to use for rendering (specifying 0 means optimal)

    Icon

    Enter a numeric value for the amount of threads to be spawned on the workers while processing this job

     Click here for details...

    Cmd Template
    This is used to create the command string for launching the job on the worker. It will be set differently depending on the application you are launching from.

    Shell (Linux/OSX)
    Explicitly specify the Linux/OS X shell to use when executing the command (defaults to /bin/sh).

    • No labels