Step by step instructions for submitting Maya jobs with Qube!
...
| Panel |
|---|
| title | Step 1 (First Time Only) |
|---|
|
Install the Qube! Submission UI into Maya| Section |
|---|
| Column |
|---|
| You will need to have installed the Maya jobtype. If you see a Qube! menu item in the top menu bar, the jobtype is already installed, and you can move to Step 2. Installation:
If you are not familiar with the installation process please refer to the Quickstart section on installing workers, or to Installing Jobtypes. <if this doesn't exist, it should> You will need to select "Maya Jobtype" during the installation process. Alternatively:
If you only wish to use the "batch maya jobs" you can install the InApp plugins via the Qube! WranglerView. File > Install App UI > Install Maya App UI If you want the submission menu inside of Maya (recommended) then install the InApp plugins via the Qube! WranglerView as shown here. To do this, launch the WranglerView: - Windows: Double-click the color desktop icon
- OS X: Find the color icon in Applications/pfx/qube and double-click on it
- Linux: Type 'qube' at the command line (without the quotes)
Then navigate to the File menu, choose "Install App UI" and choose "Install Maya App UI" You will need to do this on every workstation that you intend to submit Maya jobs from. If you don't see the "Maya App UI" entry in the menu, the Maya JobType was not installed. This should have happened with you installed the Worker, but if not, see this page for details of installing it. |
| Column |
|---|
| 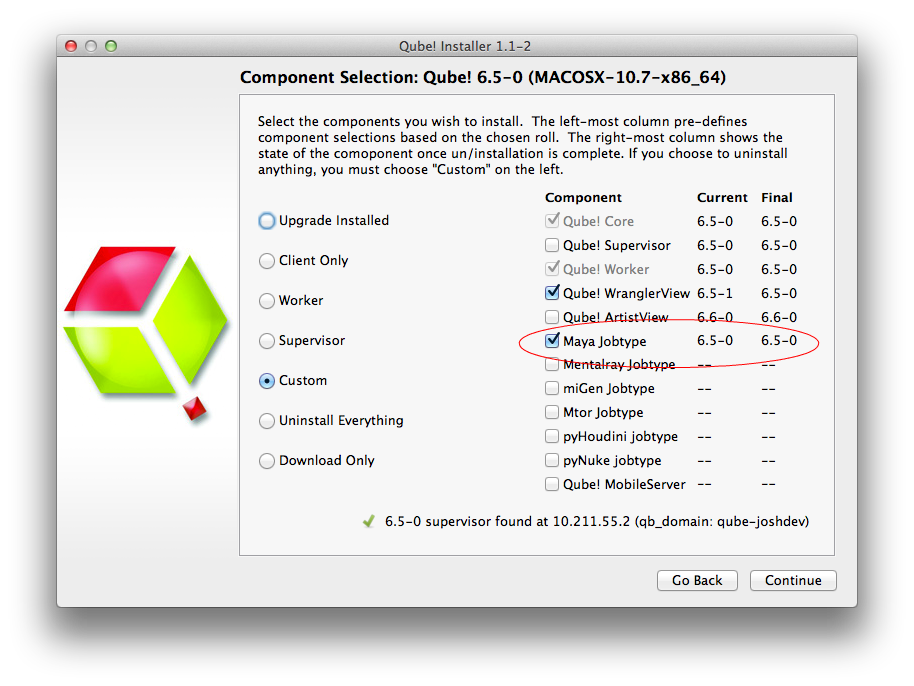 Image Removed Image Removed
 |
|
|
| Panel |
|---|
|
| Section |
|---|
| Column |
|---|
| Once installed you should be able to locate the "Qube!" menu in Maya |
|
InApp Location:  Image Removed Image Removed
File menu > Qube! |
| Panel |
|---|
|
's menu bar. With a scene loaded in Maya choose "Submit Maya Render Job..." |
|
or . Note that you could also choose "Submit Batch Render..." depending on your requirements |
|
This will present a pre filled submission UI 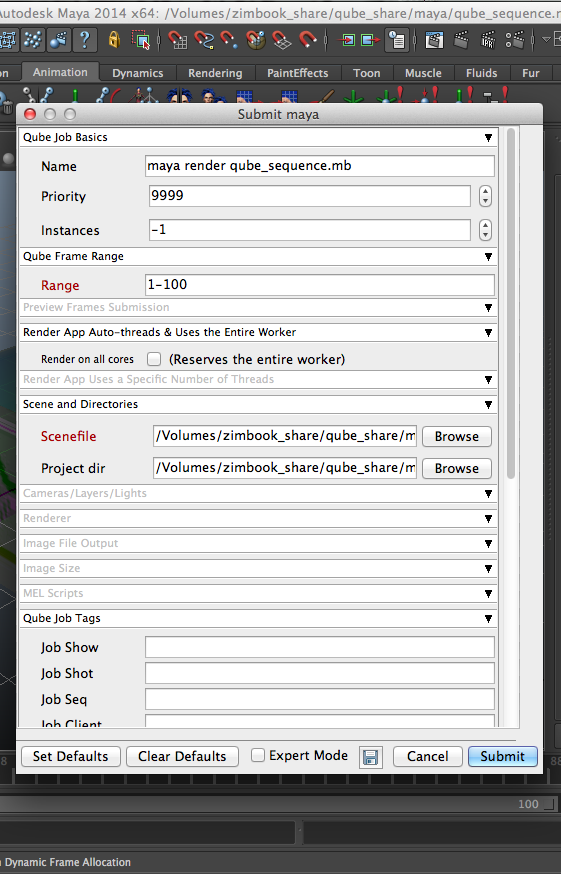 Image Removed Image Removed
. | Info |
|---|
| title | Render vs Batch Render |
|---|
| What's the difference? Submit Render will open a copy (instance) of Maya on the Worker that picks up the job, and that instance will render frames as assigned by the Supervisor. Since the scene file is only being opened one time, this can be faster to generate the full sequence. Submit Batch Render will use the command line to open a new instance of the Maya file for each frame that it renders. Although this can be slower for large scenes, it can also be more flexible in large, complex environments. |
|
| Column |
|---|
| 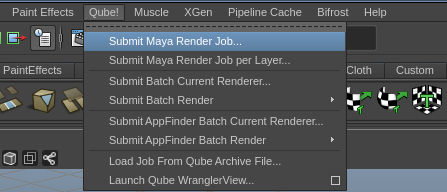 Image Added Image Added
|
|
|
| Panel |
|---|
|
| Section |
|---|
| Column |
|---|
| This will present a pre-filled submission UI like the one shown here. Ensure sections marked in red have the correct details. |
|
Click submit Image Removed Image Removed
For further details on the submission UI look in the right panel |
| Panel |
|---|
|
If you find you are getting errors here are some useful links for troubleshooting
Troubleshooting Flowcharts
Below Is an expandable view of the "Maya Job..." Jobtype Submission UI
| While not strictly required, the following settings are useful for getting a better result. You will need to turn on "Expert Mode" (check box at the bottom of the submission UI) in order to get access to them. - Optimize the use of cores. Set the "Slots = Threads" checkbox and then set the "Specific Thread Count" to a value like 8 (assuming you have 8 cores). (If you have Designer licenses, only set the thread count. Do not check "Slots = Threads")
- By default, Qube! will not retry failed frames. So set the "Retry frame/instance" value to 3 or 5, to get 3 or 5 retries before it gives up. Related to that, the default wait between retries is zero seconds, which is typically not useful. Set the "Retry Work Delay" to a value like 5 or 10 to allow machines time to recover from temporary problems such as network errors.
|
|
| Column |
|---|
| 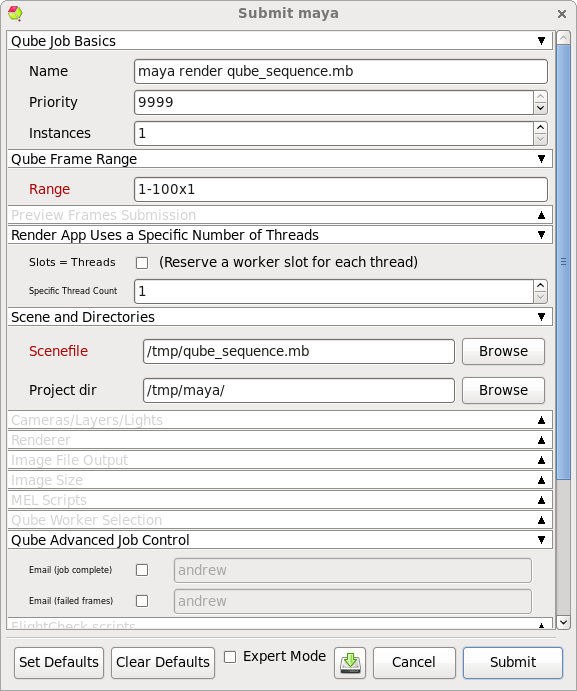 Image Added Image Added
|
|
|
| Panel |
|---|
|
| Section |
|---|
| Column |
|---|
| Click 'Submit' For further details on the submission UI see below. |
| Column |
|---|
| Image Added |
|
|
Job Submission Details
...
| Note |
|---|
Not all sections need to be filled in in order to render only the fields marked in red are required |
Please click on the text below the section of interest
 Image Removed
| Include+ |
|---|
| Excerpt Include |
|---|
| scrollPageId | 405BE23F014B092BECE9892A21AF14C8 |
|---|
| scrollEditorDisplayTitle | _SimpleCMD_QubeJobBasics |
|---|
| nopanel | true |
|---|
| scrollEditorUrl | http://docs.pipelinefx.com/display/QUBE/_SimpleCMD_QubeJobBasics |
|---|
|
| Excerpt Include |
|---|
| Include+ |
|---|
| scrollPageId | 405BE23F014B092BECCD2DB5359A0FBE |
|---|
| scrollEditorDisplayTitle | _SimpleCMD_QubeFrameRangeNoChunk |
|---|
| nopanel | true |
|---|
| scrollEditorUrl | http://docs.pipelinefx.com/display/QUBE/._SimpleCMD_QubeFrameRangeNoChunk |
|---|
|
| Excerpt Include |
|---|
|
| Include+ |
|---|
| scrollPageId | 405BE23F014B092BECDB9A2A7F86FA3C |
|---|
| scrollEditorDisplayTitle | _SimpleCMD_PreviewFramesSubmission |
|---|
| nopanel | true |
|---|
| scrollEditorUrl | http://docs.pipelinefx.com/display/QUBE/._SimpleCMD_PreviewFramesSubmission |
|---|
|
| Excerpt Include |
|---|
|
| Include+ |
|---|
| scrollPageId | 405BE23F014B092BECF1CCFC4A0BBE21 |
|---|
| scrollEditorDisplayTitle | _SimpleCMD_RenderAppAutoThreads |
|---|
| nopanel | true |
|---|
| scrollEditorUrl | http://docs.pipelinefx.com/display/QUBE/_SimpleCMD_RenderAppAutoThreads |
|---|
|
| Excerpt Include |
|---|
| Include+ |
|---|
| scrollPageId | 405BE23F014B092BECFDB09139A430C4 |
|---|
| scrollEditorDisplayTitle | _SimpleCMD_RenderAppUses |
|---|
| nopanel | true |
|---|
| scrollEditorUrl | http://docs.pipelinefx.com/display/QUBE/_SimpleCMD_RenderAppUses |
|---|
|
 Image Removed
...
...
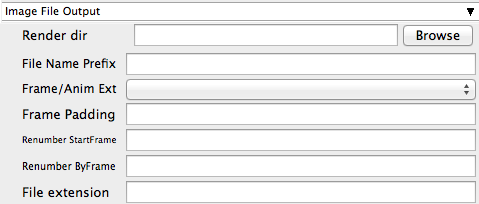 Image Removed
...
Render dir
Tooltip - Path to Maya output render directory
| Info |
|---|
Browse or manually enter the location of the output image file you wish to generate Important: Best practise is to ensure outputs are written to network storage accessible by the workers |
File Name Prefix
Tooltip - Image file name prefix override
Frame/Anim Ext
Tooltip -
| Info |
|---|
Choose from drop down to override scene settings |
Frame Padding
Tooltip - Number of digits for frame number, e.g. 4 means name.XXXX.ext
| Info |
|---|
Enter the numeric value to override scene settings |
Renumber StartFrame
Tooltip - The starting output image filename extension value.
| Info |
|---|
Enter the numeric value to override scene settings |
Renumber ByFrame
Tooltip - The output image filename extension step ('by' or increment) value
| Info |
|---|
Enter the numeric value to override scene settings |
File Extension
Tooltip - File extension name override. The string added at the end of the file name
| Info |
|---|
Enter the file extension value to override scene settings |
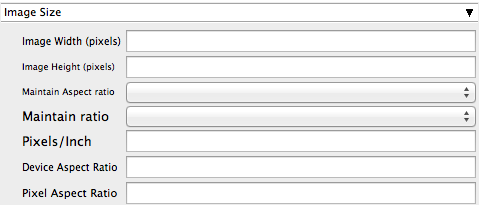 Image Removed
...
Image Width (pixels)
Tooltip - Image width
| Info |
|---|
Enter the numeric value to override scene settings |
Image Height (pixels)
Tooltip - Image height
| Info |
|---|
Enter the numeric value to override scene settings |
Maintain Aspect Ratio
Tooltip - Maintain Aspect ratio
| Info |
|---|
Select required option from drop down |
Maintain Ratio
Tooltip - Maintain ratio
| Info |
|---|
Select required option from drop down |
Pixels/Inch
Tooltip - Resolution (Pixels/Inch)
| Info |
|---|
Enter the numeric value to override scene settings |
Device Aspect Ratio
Tooltip - Device Aspect Ratio
| Info |
|---|
Enter the numeric value to override scene settings |
Pixel Aspect Ratio
Tooltip - Pixel Aspect Ratio
| Info |
|---|
Enter the numeric value to override scene settings |
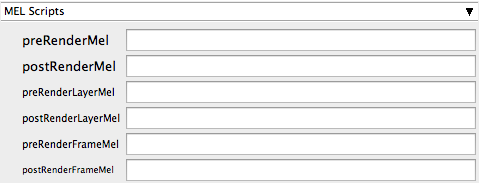 Image Removed
| Expand |
|---|
|
preRenderMel Tooltip - The mel string to be executed before a scene is rendered | Info |
|---|
Enter the script string |
postRenderMel Tooltip - The mel string to be executed after a scene is rendered | Info |
|---|
Enter the script string |
preRenderLayerMel Tooltip - The mel string to be executed before a render layer is rendered | Info |
|---|
Enter the script string |
postRenderLayerMel Tooltip - The mel string to be executed after a render layer is rendered | Info |
|---|
Enter the script string |
preRenderFrameMel Tooltip - The mel string to be executed before a frame is rendered | Info |
|---|
Enter the script string |
postRenderFrameMel Tooltip - The mel string to be executed after a frame is rendered | Info |
|---|
Enter the script string |
|
...
| 405BE23F014B092BEDAF76141F0C0ED6 |
|
...
Scenefile
Tooltip - Path to Maya scene (required)
| Info |
|---|
Browse or enter manually the location of the scene file to be rendered. This is a required field for submission Important: Best practise is to ensure the scene file and all of its dependant files such as textures are on network storage accessible by the workers. |
Project dir
Tooltip - Path to Maya project directory
| Info |
|---|
Browse or enter manually the location of the project directory Important: Best practise is to ensure the project directory and all of its dependant files such as textures are on network storage accessible by the workers. |
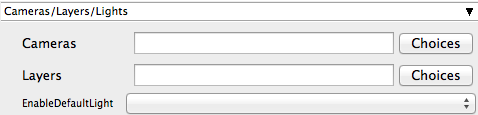 Image Removed
...
| title | Cameras/Layers/Lights |
|---|
Cameras
Tooltip - List of cameras to render (space-separated)
| Info |
|---|
Choose from pre polutated and or enter manually cameras to override scene settings |
Layers
Tooltip - List of layers to render (space-separated)
| Info |
|---|
Choose from pre polutated and or enter manually layers to override scene settings |
EnableDefaultLight
Tooltip - Enable Default Light
| Info |
|---|
Choose from drop down to override scene settings |
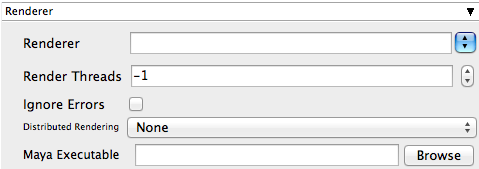 Image Removed
...
Renderer
Tooltip - Renderer Override
| Info |
|---|
Choose from drop down to override scene settings |
Render Threads
...
| Info |
|---|
Enter the numeric value to override scene settings Further explaination needed |
Ignore Errors
Tooltip - Ignore Render-time Errors: ignore error messages that are generated during render-time that would otherwise cause frame failure
| Info |
|---|
Tick box to enable ignore errors |
Distributed Rendering
Tooltip - Enable Distributed Rendering (mental ray satellite OR V-Ray DR)
Maya Executable
Tooltip - Specify path to the maya executable file (mayabatch.exe for Windows), if you want to override the auto-detected default. (optional)
| Info |
|---|
Browse or enter manually the location of Maya executable on the workers Important : Always double check the location of the workers executable being aware that if you are submitting cross platform the path will be different. |
| scrollEditorDisplayTitle | _SimpleCMD_ParametersMaya |
|---|
| scrollEditorUrl | http://docs.pipelinefx.com/display/QUBE/_SimpleCMD_ParametersMaya |
|---|
|
| Include+ |
|---|
| scrollPageId | 405BE23F014B092BED058D3406665A24 |
|---|
| scrollEditorDisplayTitle | _SimpleCMD_QubeJobTags |
|---|
| scrollEditorUrl | http://docs.pipelinefx.com/display/QUBE/_SimpleCMD_QubeJobTags |
|---|
|
| Include+ |
|---|
| scrollPageId | 405BE23F014B092BED0EE4246B9B43C9 |
|---|
| scrollEditorDisplayTitle | _SimpleCMD_QubeWorkerSelection |
|---|
| scrollEditorUrl | http://docs.pipelinefx.com/display/QUBE/._SimpleCMD_QubeWorkerSelection+v6.6-3 |
|---|
|
| Include+ |
|---|
| scrollPageId | 405BE23F014B092BED21EDF55CD47477 |
|---|
| scrollEditorDisplayTitle | _SimpleCmd_AdvancedJobControl |
|---|
| scrollEditorUrl | http://docs.pipelinefx.com/display/QUBE/._SimpleCmd_AdvancedJobControl+v6.6-3 |
|---|
|
| Include+ |
|---|
| scrollPageId | 405BE23F014B092BEDB74C720A2ED8CF |
|---|
| scrollEditorDisplayTitle | _SimpleCMD_PreFlightChecks |
|---|
| scrollEditorUrl | http://docs.pipelinefx.com/display/QUBE/_SimpleCMD_PreFlightChecks |
|---|
|
| Include+ |
|---|
| scrollPageId | 405BE23F014B092BEDC0771C002BD4E8 |
|---|
| scrollEditorDisplayTitle | _SimpleCMD_JobDelayedStart |
|---|
| scrollEditorUrl | http://docs.pipelinefx.com/display/QUBE/_SimpleCMD_JobDelayedStart |
|---|
|
| Include+ |
|---|
| scrollPageId | 405BE23F014B092BED2900AF0E13DE30 |
|---|
| scrollEditorDisplayTitle | _SimpleCMD_QubeJobEnvironment |
|---|
| scrollEditorUrl | http://docs.pipelinefx.com/display/QUBE/._SimpleCMD_QubeJobEnvironment+v6.6-3 |
|---|
|
| Include+ |
|---|
| scrollPageId | 405BE23F014B092BED37493F7556F3F0 |
|---|
| scrollEditorDisplayTitle | _SimpleCMD_QubeActions |
|---|
| scrollEditorUrl | http://docs.pipelinefx.com/display/QUBE/._SimpleCMD_QubeActions+v6.6-3 |
|---|
|
| Include+ |
|---|
| scrollPageId | 405BE23F014B092BED3FFA6C6ABA7BCD |
|---|
| scrollEditorDisplayTitle | _SimpleCMD_QubeNotes |
|---|
| scrollEditorUrl | http://docs.pipelinefx.com/display/QUBE/._SimpleCMD_QubeNotes+v7.0-0 |
|---|
|